# Redux快速上手
典型的Web应用程序通常由共享数据的多个UI组件组成。通常,多个组件的任务是负责展示同一对象的不同属性。这个对象表示可随时更改的状态。在多个组件之间保持状态的一致性会是一场噩梦,特别是如果有多个通道用于更新同一个对象。
# 什么是Redux
Redux是一个流行的JavaScript框架,为应用程序提供一个可预测的状态容器。Redux基于简化版本的Flux框架,Flux是Facebook开发的一个框架。在标准的MVC框架中,数据可以在UI组件和存储之间双向流动,而Redux严格限制了数据只能在一个方向上流动。 见下图:

在Redux中,所有的数据(比如state)被保存在一个被称为store的容器中 → 在一个应用程序中只能有一个。store本质上是一个状态树,保存了所有对象的状态。任何UI组件都可以直接从store访问特定对象的状态。要通过本地或远程组件更改状态,需要分发一个action。分发在这里意味着将可执行信息发送到store。当一个store接收到一个action,它将把这个action代理给相关的reducer。reducer是一个纯函数,它可以查看之前的状态,执行一个action并且返回一个新的状态。
# 配置Redux
配置Redux开发环境的最快方法是使用create-react-app工具。在开始之前,确保已经安装并更新了nodejs,npm或yarn。我们生成一个redux-shopping-cart项目并安装Redux:
create-react-app redux-shopping-cart

cd redux-shopping-cart
yarn add redux # 或者npm install redux
2
3
4
首先,删除src文件夹中除index.js以外的所有文件。打开index.js,删除所有代码,键入以下内容:
import { createStore } from "redux";

const reducer = function(state, action) {
  return state;
}

const store = createStore(reducer);
2
3
4
5
6
7
- 首先,我们从redux包中引入createStore()方法。
- 我们创建了一个名为reducer的方法。第一个参数state是当前保存在store中的数据,第二个参数action是一个容器,用于:
type - 一个简单的字符串常量,例如ADD, UPDATE, DELETE等。
payload - 用于更新状态的数据。 - 我们创建一个Redux存储区,它只能使用reducer作为参数来构造。存储在Redux存储区中的数据可以被直接访问,但只能通过提供的reducer进行更新。
注意到,我在第二点中所提到state。目前,state为undefined或null。要解决这个问题,需要分配一个默认的值给state,使其成为一个空数组:
const reducer = function(state=[], action) {
  return state;
}
2
3
让我们更进一步。目前我们创建的reducer是通用的。它的名字没有描述它的用途。那么我们如何使用多个reducer呢?我们将用到Redux包中提供的combineReducers函数。修改代码如下:
// src/index.js

import { createStore } from "redux";
import { combineReducers } from 'redux';

const productsReducer = function(state=[], action) {
  return state;
}

const cartReducer = function(state=[], action) {
  return state;
}

const allReducers = {
  products: productsReducer,
  shoppingCart: cartReducer
}

const rootReducer = combineReducers(allReducers);

let store = createStore(rootReducer);
2
3
4
5
6
7
8
9
10
11
12
13
14
15
16
17
18
19
20
21
在上面的代码中,我们将通用的reducer修改为productReducer和cartReducer。创建这两个空的reducer是为了展示如何在一个store中使用combineReducers函数组合多个reducer。
接下来,我们将为reducer定义一些测试数据。修改代码如下:
// src/index.js
…
const initialState = {
cart: [
{
product: 'bread 700g',
quantity: 2,
unitCost: 90
},
{
product: 'milk 500ml',
quantity: 1,
unitCost: 47
}
]
}
const cartReducer = function(state=initialState, action) {
return state;
}
…
let store = createStore(rootReducer);
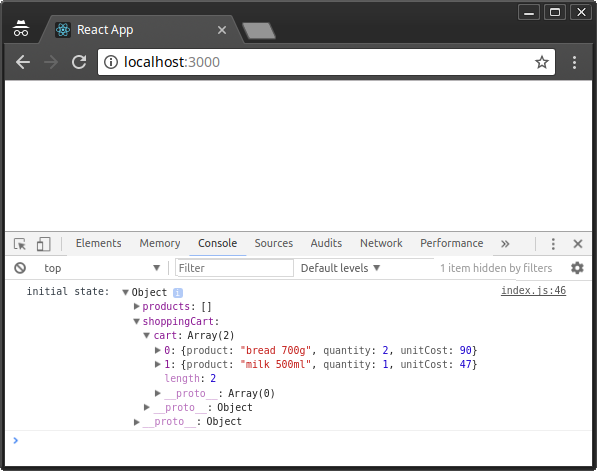
console.log("initial state: ", store.getState());
2
3
4
5
6
7
8
9
10
11
12
13
14
15
16
17
18
19
20
21
22
23
24
25
26
27
28
我们使用store.getState()在控制台中打印出当前的状态。你可以在终端中执行npm start或者yarn start来运行dev服务器。并在控制台中查看state。
现在,我们的cartReducer什么也没做,但它应该在Redux的存储区中管理购物车商品的状态。我们需要定义添加、更新和删除商品的操作(action)。我们首先定义ADD_TO_CART的逻辑:
// src/index.js

…

const ADD_TO_CART = 'ADD_TO_CART';

const cartReducer = function(state=initialState, action) {
  switch (action.type) {
    case ADD_TO_CART: {
      return {
        ...state,
        cart: [...state.cart, action.payload]
      }
    }

    default:
      return state;
  }
}

…
2
3
4
5
6
7
8
9
10
11
12
13
14
15
16
17
18
19
20
21
我们继续来分析一下代码。一个reducer需要处理不同的action类型,因此我们需要一个SWITCH语句。当一个ADD_TO_CART类型的action在应用程序中分发时,switch中的代码将处理它。 正如你所看到的,我们将action.payload中的数据与现有的state合并以创建一个新的state。
接下来,我们将定义一个action,作为store.dispatch()的一个参数。action是一个Javascript对象,有一个必须的type和可选的payload。我们在cartReducer函数后定义一个:
function addToCart(product, quantity, unitCost) {
  return {
    type: ADD_TO_CART,
    payload: { product, quantity, unitCost }
  }
}
2
3
4
5
6
在这里,我们定义了一个函数,返回一个JavaScript对象。在我们分发消息之前,我们添加一些代码,让我们能够监听store事件的更改。
let unsubscribe = store.subscribe(() =>
  console.log(store.getState())
);

unsubscribe();
2
3
4
5
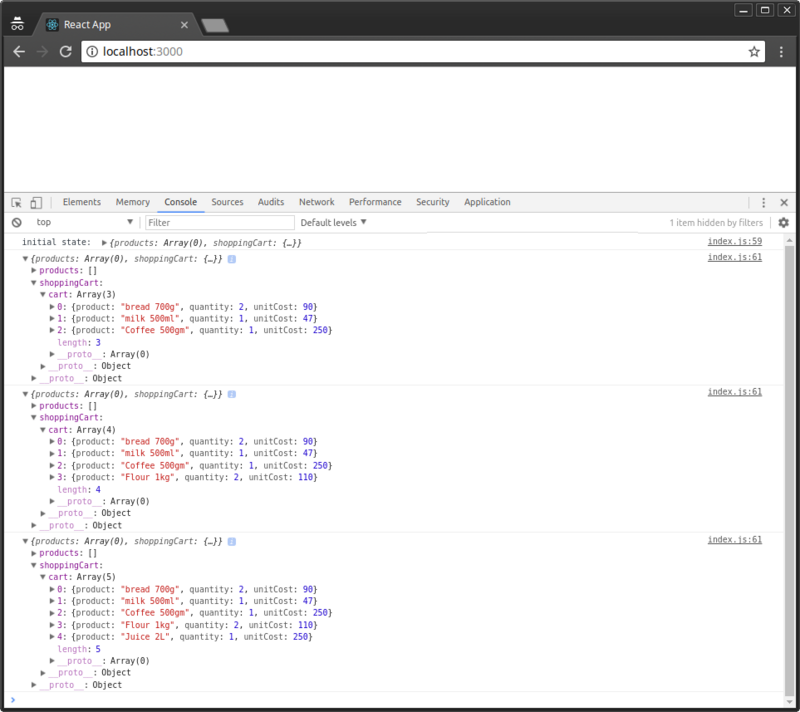
接下来,我们通过分发消息到store来向购物车中添加商品。将下面的代码添加在unsubscribe()之前:
store.dispatch(addToCart('Coffee 500gm', 1, 250));
store.dispatch(addToCart('Flour 1kg', 2, 110));
store.dispatch(addToCart('Juice 2L', 1, 250));
2
3
下面是整个index.js文件:
// src/index.js

import { createStore } from "redux";
import { combineReducers } from 'redux';

const productsReducer = function(state=[], action) {
  return state;
}

const initialState = {
  cart: [
    {
      product: 'bread 700g',
      quantity: 2,
      unitCost: 90
    },
    {
      product: 'milk 500ml',
      quantity: 1,
      unitCost: 47
    }
  ]
}

const ADD_TO_CART = 'ADD_TO_CART';

const cartReducer = function(state=initialState, action) {
  switch (action.type) {
    case ADD_TO_CART: {
      return {
        ...state,
        cart: [...state.cart, action.payload]
      }
    }

    default:
      return state;
  }
}

function addToCart(product, quantity, unitCost) {
  return {
    type: ADD_TO_CART,
    payload: {
      product,
      quantity,
      unitCost
    }
  }
}

const allReducers = {
  products: productsReducer,
  shoppingCart: cartReducer
}

const rootReducer = combineReducers(allReducers);

let store = createStore(rootReducer);

console.log("initial state: ", store.getState());

let unsubscribe = store.subscribe(() =>
  console.log(store.getState())
);

store.dispatch(addToCart('Coffee 500gm', 1, 250));
store.dispatch(addToCart('Flour 1kg', 2, 110));
store.dispatch(addToCart('Juice 2L', 1, 250));

unsubscribe();
2
3
4
5
6
7
8
9
10
11
12
13
14
15
16
17
18
19
20
21
22
23
24
25
26
27
28
29
30
31
32
33
34
35
36
37
38
39
40
41
42
43
44
45
46
47
48
49
50
51
52
53
54
55
56
57
58
59
60
61
62
63
64
65
66
67
68
69
70
71
保存代码后,Chrome会自动刷新。可以在控制台中确认新的商品已经添加了。
# 组织Redux代码
index.js中的代码逐渐变得冗杂。我把所有的代码都写在index.js中是为了起步时的简单易懂。接下来,我们来看一下如何组织Redux项目。首先,在src文件夹中创建一下文件和文件夹:
src/
├── actions
│ └── cart-actions.js
├── index.js
├── reducers
│ ├── cart-reducer.js
│ ├── index.js
│ └── products-reducer.js
└── store.js
然后,我们把index.js中的代码进行整理:
// src/actions/cart-actions.js

export const ADD_TO_CART = 'ADD_TO_CART';

export function addToCart(product, quantity, unitCost) {
  return {
    type: ADD_TO_CART,
    payload: { product, quantity, unitCost }
  }
}
2
3
4
5
6
7
8
9
10
// src/reducers/products-reducer.js

export default function(state=[], action) {
  return state;
}
2
3
4
5
// src/reducers/cart-reducer.js

import  { ADD_TO_CART }  from '../actions/cart-actions';

const initialState = {
  cart: [
    {
      product: 'bread 700g',
      quantity: 2,
      unitCost: 90
    },
    {
      product: 'milk 500ml',
      quantity: 1,
      unitCost: 47
    }
  ]
}

export default function(state=initialState, action) {
  switch (action.type) {
    case ADD_TO_CART: {
      return {
        ...state,
        cart: [...state.cart, action.payload]
      }
    }

    default:
      return state;
  }
}
2
3
4
5
6
7
8
9
10
11
12
13
14
15
16
17
18
19
20
21
22
23
24
25
26
27
28
29
30
31
32
// src/reducers/index.js

import { combineReducers } from 'redux';
import productsReducer from './products-reducer';
import cartReducer from './cart-reducer';

const allReducers = {
  products: productsReducer,
  shoppingCart: cartReducer
}

const rootReducer = combineReducers(allReducers);

export default rootReducer;
2
3
4
5
6
7
8
9
10
11
12
13
14
// src/store.js

import { createStore } from "redux";
import rootReducer from './reducers';

let store = createStore(rootReducer);

export default store;
2
3
4
5
6
7
8
// src/index.js

import store from './store.js';
import { addToCart }  from './actions/cart-actions';

console.log("initial state: ", store.getState());

let unsubscribe = store.subscribe(() =>
  console.log(store.getState())
);

store.dispatch(addToCart('Coffee 500gm', 1, 250));
store.dispatch(addToCart('Flour 1kg', 2, 110));
store.dispatch(addToCart('Juice 2L', 1, 250));

unsubscribe();
2
3
4
5
6
7
8
9
10
11
12
13
14
15
16
整理完代码之后,程序依然会正常运行。现在我们来添加修改和删除购物车中商品的逻辑。修改cart-actions.js和cart-reducer.js文件
// src/reducers/cart-actions.js
…
export const UPDATE_CART = 'UPDATE_CART';
export const DELETE_FROM_CART = 'DELETE_FROM_CART';
…
export function updateCart(product, quantity, unitCost) {
  return {
    type: UPDATE_CART,
    payload: {
      product,
      quantity,
      unitCost
    }
  }
}

export function deleteFromCart(product) {
  return {
    type: DELETE_FROM_CART,
    payload: {
      product
    }
  }
}
2
3
4
5
6
7
8
9
10
11
12
13
14
15
16
17
18
19
20
21
22
23
24
// src/reducers/cart-reducer.js
…
export default function(state=initialState, action) {
  switch (action.type) {
    case ADD_TO_CART: {
      return {
        ...state,
        cart: [...state.cart, action.payload]
      }
    }

    case UPDATE_CART: {
      return {
        ...state,
        cart: state.cart.map(item => item.product === action.payload.product ? action.payload : item)
      }
    }

    case DELETE_FROM_CART: {
      return {
        ...state,
        cart: state.cart.filter(item => item.product !== action.payload.product)
      }
    }

    default:
      return state;
  }
}
2
3
4
5
6
7
8
9
10
11
12
13
14
15
16
17
18
19
20
21
22
23
24
25
26
27
28
29
最后,我们在index.js中分发这两个action:
// src/index.js
…
// Update Cart
store.dispatch(updateCart('Flour 1kg', 5, 110));

// Delete from Cart
store.dispatch(deleteFromCart('Coffee 500gm'));
…
2
3
4
5
6
7
8
# 使用Redux工具调试
Redux拥有很多第三方的调试工具,可用于分析代码和修复bug。最受欢迎的是time-travelling tool,即redux-devtools-extension (opens new window)。设置它只需要三个步骤。
首先,在Chrome中安装Redux Devtools (opens new window)扩展。
然后,在运行Redux应用程序的终端里使用Ctrl+C停止服务器。并用npm或yarn安装redux-devtools-extension包。
一旦安装完成,我们对store.js稍作修改:
// src/store.js
import { createStore } from "redux";
import { composeWithDevTools } from 'redux-devtools-extension';
import rootReducer from './reducers';

const store = createStore(rootReducer, composeWithDevTools());

export default store;
2
3
4
5
6
7
8
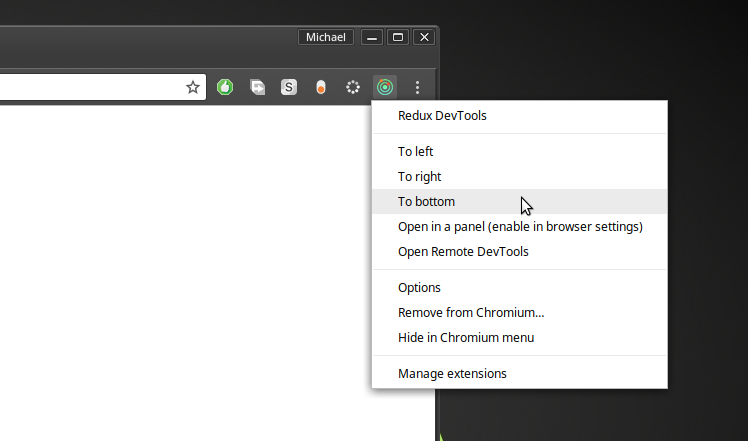
我们还可以把src/index.js中日志相关的代码删除掉。返回Chrome,右键单击该工具的图标,打开Redux DevTools面板:
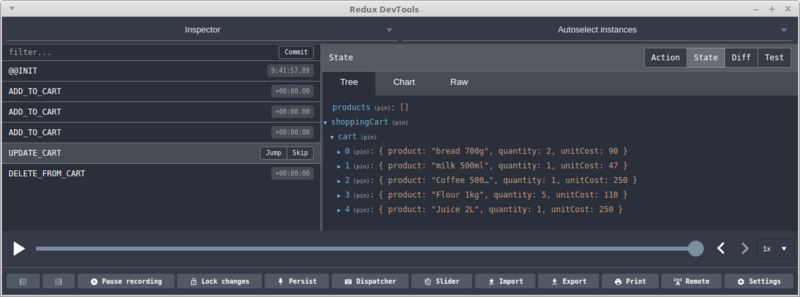
可以看到,Redux Devtools很强大。你可以在action, state和diff(方法差异)之间切换。选择左侧面板上的不同action,观察状态树的变化。你还可以通过进度条来播放actions序列。甚至可以通过工具直接分发操作信息。具体的请查看文档。
# 集成React
在本文开头,我提到Redux可以很方便的与React集成。只需要简单的几步。
- 首先,停止服务器,并安装react-redux包:
yarn add react-redux
- 接下来,在index.js中加入React代码。我们还将使用Provider类将React应用程序包装在Redux容器中:
// src/index.js
…
import React from 'react';
import ReactDOM from 'react-dom';
import { Provider } from 'react-redux';

const App = <h1>Redux Shopping Cart</h1>;

ReactDOM.render(
  <Provider store={store}>
    { App }
  </Provider> ,
  document.getElementById('root')
);
…
2
3
4
5
6
7
8
9
10
11
12
13
14
15
目前,已经完成了集成的第一部分。可以启动服务器以查看效果。第二部分涉及到使用刚刚安装的react-redux包中的几个方法。通过这些方法将React组件与Redux的store和action相关联。此外,还可以使用Express (opens new window)和Feathers (opens new window)这样的框架来设置API。API将为我们的应用程序提供对数据库服务的访问。
在Redux中,我们还可以安装其他一些包,比如axios等。我们React组件的state将由Redux处理,确保所有组件与数据库API的同步。